A first look at Excel
In the first part of our Excel tutorials, we'll explain what you will see when the programme first starts. We're not going to explain what a spreadsheet is, and assume that you already know. If you don't, we have an introduction here: Launch your Excel software. When the programme starts, you'll see something like this in Excel 2007:In newer versions of Excel, you may see a screen like this one first (Excel 2013):
To create a new spreadsheet in Excel 2013, click one of the templates. For this course, we'll be using the Blank Workbook temple. Click on that option from the list available. You'll be taken to the main spreadsheet area.
If you've ever used a previous version of Excel then you'll notice that the new version looks quite different! Even if you have never used Excel, the software looks quite intimidating. But we'll make a gentle start, so that you can get used to the way everything works.
The first thing to notice is the Ribbon running right across the top. The Ribbon is supposed to be more intuitive than drop-down menus. Emphasis is placed on the tools and options appropriate to what you're doing. Here's a closer look at the Ribbon when Excel first starts (it's split in half, here):
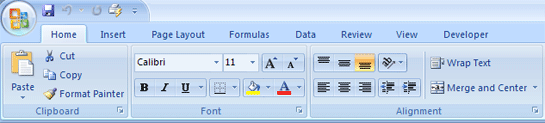
Left Side of the Ribbon in Excel 2007
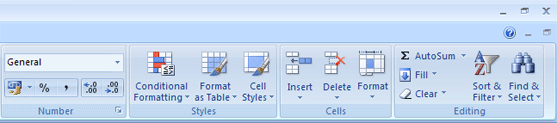
Right Side of the Ribbon in Excel 2007
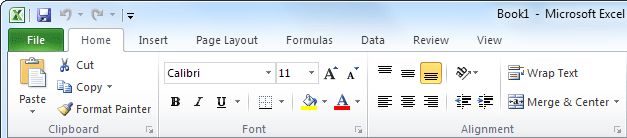
Left Side of the Ribbon in Excel 2010 and 2013

Right Side of the Ribbon in Excel 2010 and 2013
Notice that in both versions the Home tab is the one that
is selected. Other tabs are: Insert, Page Layout, Formulas, Data, Review
and View. (In the image above, there's also a Developer tab. If you
don't do any programming then you don't have to worry about this tab.)
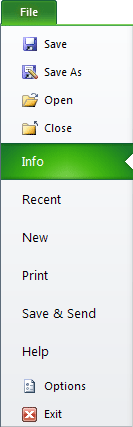
In the top left of the Ribbon in Excel 2007 there's a big circle. This
one:
Click this, and you'll see all the file operations: New,
Open, Save, Exit, etc.
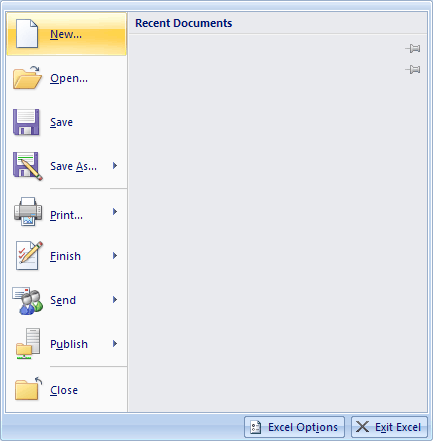
To see the same menu in Excel 2010, you have to click
on the File tab, which is on the far left. (It looks as though it's
already selected, but it's not.):
Excel 2013 also has a File menu like the one above. When
you click the File menu in Excel 2013, however, you'll see this instead:

To get back to your spreadsheet in Excel 2013, click the
left-pointing arrow in the top left:
We'll go through all these menu options later, along with
the various options on the Ribbon tabs. But the best place to start
with Excel is getting to grips with all those numbers and letters. These
are the Grid Coordinates. We'll do that in the next part.
Excel Rows and Columns
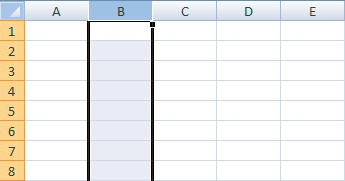
Spreadsheets are displayed in a grid layout. The letters
across the top are Column headings. To highlight an entire Column, click
on any of the letters. The image below shows the B Column highlighted:
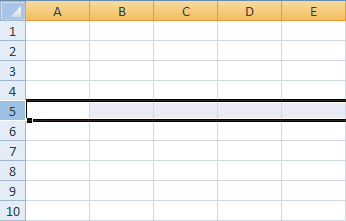
If you look down the left side of the grid, you'll see
numbers, which start at number 1 at the very top and go down to over
a million. (The exact number of rows and columns are 1,048,576 rows
and 16,384 columns. You've never going to need this many!) You can click
a number to highlight an entire Row. If you look at the image below,
you'll see that Row 5 has been highlighted (The image is from Excel
2007. Later are version are the same except less colourful!).
Spreadsheets are all about individual Cells. A Cell is
a letter combined with a number. So if you combine the B column with
Row 5, you get Cell B5. Combine Column D with Row 5 and you get Cell
D5.
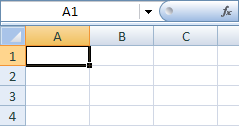

The first picture is Column A, Row 1 (A1), and the second
picture is Column C Row 3 (C3). Notice that the cells we clicked on
have a black border around them. This tells you the cell is active.
The cell that is active will have its Column letter and Row number displayed
in the top left, just above the letters A and B in the pictures. When
you click into a cell, you can then type text and numbers.
To move around the spreadsheet, and make other cells active, you can
either just click inside a Cell, or press the arrow keys on your keyboard.
Try it now. Click inside a Cell and notice the Cell reference appear
above the letters A and B. Press your arrow keys and notice how the
active cells moves.Before going any further, make sure you understand how the spreadsheet grid works. If you are asked to locate Cell H2, you should be able to do so.
How to Enter Text and Numbers in a Cell
To make a start, we'll create this really simple spreadsheet:

All we're going to be doing here is entering some text
and some numbers. We're not adding anything up yet.
Before you tackle this first exercise, though, you may want to take
note of the Undo feature, just in case you make a mistake. The
Undo option is the left curved arrow, right at the top of your screen.
This one for Excel 2007 users:
And this one for Excel 2010 and Excel 2013 users:
Click the left curved arrow to Undo something, and click
the right curved arrow to redo it. The Undo arrow also has a dropdown
box. Click the small arrow next to Undo to see the following:

But back to the spreadsheet.
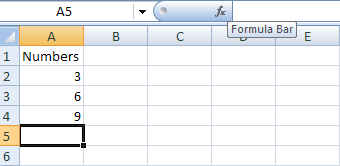
Click inside of cell A1 on your spreadsheet, and do the following:
- Type the word "Numbers" (with no quotation marks)
- Hit the Enter key on your keyboard
- The active cell will move down one, to cell A2
- Type the number 3, and again hit the Enter key on your keyboard
- The active cell will move down one, to cell A3
- Now put the number 6 into cell A3, and the number 9 in cell A4
- After you have typed the number 9, and hit the Enter key, you should see that cell A5 is now the active cell
How to Edit Text in a Cell
In the previous part, you created a simple Excel spreadsheet. You'll now learn how to edit text in a cell.To change the text in cell A1, you can just click inside of the cell and start typing. Anything you had there previously would be erased. But if you just want to edit the text (if you've made a spelling mistake, for example), then this is no good. If you want to keep most of the text, and just make minor changes, then you need to do something else.In the image below, you can see what's known as the Formula Bar. The Formula Bar is like a long textbox that you can click inside and start typing. Here's what it looks like in Excel 2007:
 And here it is in Excel 2010 and 2013:
 To edit a Cell in Excel, first click inside the cell you want to edit (A1 for us). Then click inside the formula bar. Notice where your cursor is now:
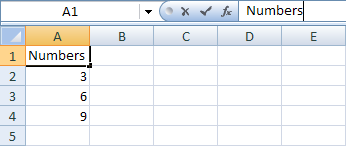 The image above shows that the cell A1 is active, but the cursor is inside of the formula bar.With the cursor in the Formula Bar, try changing the text "Numbers" to "Add these Numbers". Press the Enter key when you've made the changes. Your spreadsheet should look like ours below:
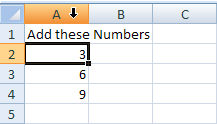
 Notice that the active cell is now A2, and that the Formula Bar has a 3 in it.However, there's a problem. There's not enough room in cell A1 for our new text. Part of it seems to be in the B column.
The solution is to widen the whole of Column A. Try this:
- Move your mouse up to the start of the A Column
- The pointer will change shape and now be a black arrow
- Move your mouse over the line that separates Column A and Column B
- Your mouse pointer will change shape again, this time to a cross with arrows

- When you see the new shape, hold down your left mouse button
- Keep the left mouse button held down, and drag your cross to the right
- Once you have all the text in the A column, let go of the left mouse button. The images below show the process in action (the top two are from Excel 2007 and the bottom two are from Excel 2010/2013):


You can make the height of the Rows bigger or smaller
by using exactly the same technique.
No comments:
Post a Comment