Downloading the Stories
In this section, we're going to create a booklet. Our
booklet will have a cover page, a contents page, page numbering, and
some clip art. You'll also learn about section breaks, and about Word
Styles.
The contents for the booklet can be found in the Extra_Files folder
that you need to download. They are a series of short tales that we
have translated from the original French. Before doing so, however,
if you don't know how to save and access a zip file, read below.How to Save and Open Zip Files
Click on the link above with your right mouse button. From the menu that appears select Save Target As (or Save Link As if you use Firefox to browse the internet). You'll then see a dialogue box where you can choose a location on your computer to save the file: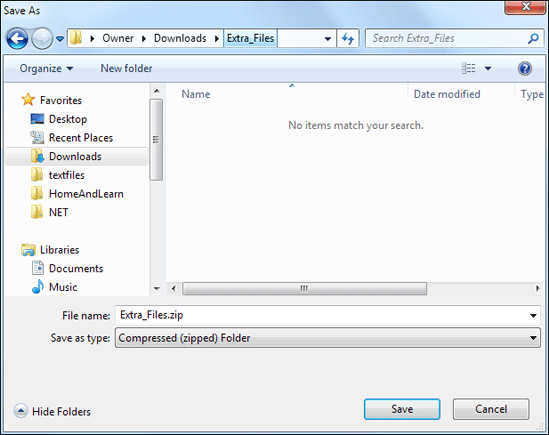

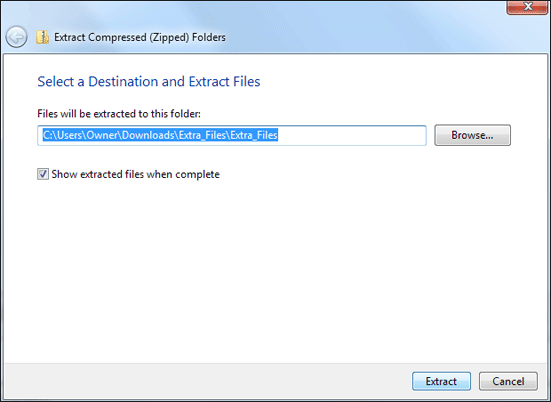
Now that you have downloaded the zip file, you need to unzip it. Open up an explorer window by clicking the round Start button in the bottom left of Windows 7 or Windows Vista. From the menu, select Computer. If you have Windows 8 you can do a search for the file name Extra_Files.zip.
Navigate to where on you computer you saved your zip file to:


With the files downloaded and extracted, we can make a start.
So click the Office button and click the New item from the menu, if you have Word 2007. If you have Word 2010 or Word 2013, click the File tab then the New item on the left menu. Then select the Blank document template.
Save your new blank document with the name Fairy Tales.
Inserting a Story
The first thing to do is to insert the stories.Click the Insert tab at the top of Word and locate the Text panel. Click the arrow next to the Object item, and select Text from file:


When you click on Text from file a dialogue box will appear.
Navigate to your Extra_Files > Stories folder and select the
Cendrillon file:

Click the Insert button to insert the file into
your blank document.
Creating your own Style
The Home tab contains the Styles panel, which is quite large. Styles refer to the font and formatting options that you can use to quickly change some text on your page. Some Inbuilt ones are Heading1, Heading2, Normal, and Title. What we'll do is to create our own styles, one for the titles of the stories and one for the body text.We'll set up a style for the titles first.
From the Paragraph panel on the Home tab, centre your title. Your page should then look like this: (Make sure you don't deselect your heading.)

From the Styles panel click the bottom arrow on
the list of styles, circled in red below:
When you click the arrow, you should see a list appear.
Select the item that says "Save selection as a new quick style"
(In Word 2013 it will say "Create a Style"):

You should then see a dialogue box appear. Type a name
for your style. We've called ours Fairy_Tales_Title:

Click OK and your style will be added to the list:

But the point about creating a style of your own is that
you can then highlight some text and choose it from the list. Your selected
text will then be formatted to match the style you set up.
Click anywhere in your document to deselect the heading.Adapting an inbuilt style
You can also adapt a style that has already been set up. We'll adapt the Normal style, shown on the list above, the second item on the top row. The Normal style refers to all of the body text. In other words, all the text that is not a title.To adapt a style, click with your right mouse button on the style you want to change. In our case that is the Normal style:

From the menu that appears, select Modify. When
you click Modify, you'll see a dialogue box appear. This one:

The Name of the style you're modifying is at the top (Normal,
for us). Under the Formatting heading, you'll see a font dropdown box,
along with a size option. You can also use the Bold, Underline, Italics,
and alignment buttons.
But select a different font and font size from the dropdown boxes:
We've gone for Century Gothic as a size of 12 points.
Before you click OK, make sure to select the option in the bottom left
that says "Only in this document". In other words, you only
want to change the Normal style for this particular document, and not
for every document you create.Click OK and the body text of all seven pages of the story will change. (If you've chosen the same font and font size as us, there will now be eight pages to your story.)
Page Breaks and Section Breaks
When we add a new story, we want it to begin on a new page. To do this, you can add breaks. There are two types of breaks, page breaks and section breaks. Section breaks allow you to format things like headers and footers differently. For example, we don't want headers on pages with a title, but we do want them on other pages. Section breaks are ideal for this. If you didn't have them, each page would have the same header.
Click on the Page Layout tab at the top of Word.
Locate the Page Setup panel and the Breaks item:

Click on Breaks to see the following menu:

The one we want is Section Breaks > Next Page.
What this does is to add a new page to your document, and a new section.
Your cursor should now be flashing on the new blank page.
To check that you have indeed added a new section, have a look in the
bottom left of word. You should see a Section area on your
Status Bar:
If you can't see the Section area, right click on the
blue bar. From the menu that appears, click on Section:

If you were to click onto, say, page 1 of your story,
the Section part of the Status Bar will read Section 1 instead of Section
2.
But with your cursor flashing on your new blank page, and in section
2, insert a new story just like you did for the first one.You should find that all the text in your new story is formatted to the same as the first one. In other words, it will be formatted to the Normal style that we modified. This is fine, but the title isn't.
So highlight just the title of your new story. To change the style to the Fairy_Tales_Title style you set up, click back on the Home tab to see all the styles. Although you could select the style from the list, click the small arrow in the bottom right of the Styles panel, circled in red in the image below:
You should find that a menu will appear on the right of
your screen, and stay there. To get rid of it, click that small arrow
again. But the list displays all the styles that have been set up, including
the one we want. So, with your title highlighted, click the Fairy_Tales_Title
style from the list:

Your title of the second story will then change to match
the first one in your booklet.
Add the remaining three stories in the same manner as you did for the
second one:-
Insert a Section Break
-
Insert the story
-
Change the style of the title
We'll add a cover page and a contents page next. But we
need two blank pages at the start. So move your cursor to the very start
of your document, on the top line. (Hold down the UP arrow on your keyboard
until it can't move any further.)
Now insert two more section breaks. (Page Layout tab, then Breaks
> Section Break > Next Page.) Your first story will then start
in Section 3. The first blank page will be Section 1, and the second
blank page will be Section 2. With your cursor flashing at the top of
Section 1, change your Style to Normal, if it's not already set to that
style. Otherwise, when you press the enter key you may get the Fairy
Tales Heading style for each paragraph instead.Add a Cover Page to your Booklet
There are actually a few inbuilt cover pages, on the Insert tab, Pages panel. You can use one of these, if you like. However, reformatting them to suit your needs is a bit tricky. So we'll do our own. First, we can check that the Section breaks are in the right place.
The backwards P is used to show or hide paragraph and
symbol formatting marks. Click it once to activate it. You should see
this at the top of your two blank pages:

You can zoom out using the plus and minus symbols in the
Status Bar in the bottom right of Word. That way, you can see two pages
on the screen at once. Or click the View tab, and then the Two
Pages item on the Zoom panel.
You can change the margins for a single page. They are a bit too big
on the cover page, at the moment. So we'll change them.With your cursor flashing at the top of the cover page, click on the Page Layout tab. Locate the Page Setup panel. Click on the Margins item to see a menu appear. Then select Custom Margins at the bottom:

When you click on Custom Margins you'll see a dialogue
box appear. This one:

Change the margins to the following:
Top: 1 cm
Left: 1 cm
Right: 1 cm
Bottom: 1 cm
(If your measurements are in inches, use 0.4 instead of 1 cm.)Left: 1 cm
Right: 1 cm
Bottom: 1 cm
Look at the bottom of the dialogue box and locate Apply to. Set it to "This Section".
Your dialogue box should look like this before you click OK:

We'll set a border for our cover page. Before doing that,
create some space on your page by holding down the Enter key on your
keyboard. Keep it held down until the Section Break is at the bottom
of your page: (If you go too far, hit the Backspace key)

You can now hide the formatting marks by clicking the
backward P again (Home tab, Paragraph panel.)
To set a border for the cover page, click back on the
Page Layout tab. (In Word 2013, click the Design tab instead
of Page Layout.) Locate the Page Background panel and click the
Page Borders item:

When you click on Page Borders, you'll see the following
dialogue box appear:

From the Setting list on the left, click on Box.
You can create a Box type border by using the four items in the middle:
Style, Colour, Width, Art. We'll use the
Art item. So click the arrow to see the following list:

You can select any one you like, but we've chosen a fancy
one from the middle of the list.
Now locate the Apply to dropdown box on the right and set it
to This Section:
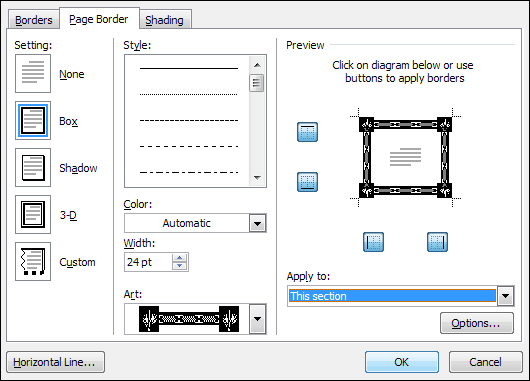
When you're done, click OK. Your cover page will then
look like this:

You can still type onto this page. Click your left mouse
button about half way up the page, and type a title. Type Fairy Tales.
Change the font and font size.
Be careful of where your Section Break ends up when you change the
font size. Click the backwards P again to check it's still at the bottom.
If you add clip art or an image that is too big it will push the section
break down onto page 2, and give you a border on this page as well.
Use your backspace key to get the section break back onto page 1. Any
border that appears on page 2 will then disappear.Your page may now look something like this:


You could add some clip art at this stage, just to liven the cover page up a bit. We'll leave ours, though. Again, be careful of where your section break ends up if you insert clip art.
No comments:
Post a Comment