Highlighting Text in Microsoft Word
It's a lot easier to show you what highlighting is, rather than explaining it. So examine the image below, which is what your letter should look like so far:
The two lines with the blue background have been highlighted
(the blue highlight will be grey in some versions of Word). When you
highlight some text you can do things with it. You can change the size
of the font, underline it, make it bold, delete it altogether, and many
other things. But only the text that you have highlighted will change.
The rest of your document will remain unchanged. So if we were to change
the size of the font in the document above, only the two lines that
have been highlighted will change size. Highlighting is very important
in word processing.
So how do you highlight some text?There are quite a few different ways to highlight text. We'll go through a few now. Practice them as you go along.
How to highlight an entire document
You can highlight your entire document from the Home tab at the top of Word. On the right hand side, you should see an Editing section:
Click on the Select item to see a menu appear:

In Word 2010 and 2013 you'll see an extra item on the
menu, right at the bottom:

Click Select All from the menu to highlight an
entire document. To get rid of highlighted text, click anywhere in your
document with your left mouse button.
An easier way to highlight all the text in your document is via a keyboard
shortcut. Hold down the CTRL key on your keyboard. Keep it held down
and press the letter A. This is will select all text. (This shortcut
works in other software, not just Microsoft Word.)How to highlight an entire line
Most of the time, though, you won't want to highlight the entire document, but just sections of it. You can highlight an entire line with just one mouse click.To highlight a single line, move your mouse over to the left margin of your document. As in the image below:

If you can't see a ruler at the top of the page and the
left of the page, click the tiny icon in the top right of Microsoft
Word:
Another way to display rulers is from the View
tab in the Ribbon at the top of Word. Locate the Show/Hide panel,
and the click the Ruler item:


You can use the same technique to highlight more than
one line at a time. Instead of letting go of the left mouse button,
keep it held down. Then move your mouse upwards or downwards in a straight
line.

Let go of the mouse button when you are satisfied.
Highlighting blocks of text
This one is a little trickier, but not too tricky. To highlight a block of text, do the following:-
Click at the start of the block of text you want to highlight. (For practice purposes, click just before the letter "I" of "It has come …" on the first line.)
-
Hold down the Shift key on your keyboard (The Shift keys are the ones with the block arrows on them, pointing upwards. You hold down a shift key if you want a capital letter.)
-
With the Shift key held down, click your left mouse button at the end of the block of text you want to highlight. (Click after the question mark of " … premature?")
-
A block of text will be highlighted
Highlight by dragging
This is another tricky one, when you're starting out. A bit of practice, though, and you'll soon master it. To highlight some text by dragging, do the following:-
Click with your left mouse button at the start of the text you want to highlight
-
Keep your left mouse button held down
-
Drag your mouse pointer across the screen (Your mouse pointer will change shape. It will be the shape of a capital letter I.)
-
You can drag in any direction you like
-
When you've reached the end of the text you want to highlight, let go of the mouse button
-
Your text is highlighted
Highlighting a single word
Highlighting a single word is easy. All you have to do is to double click on the word with your left mouse button. That's it!
Highlighting with the keyboard (no mouse needed)
For more precise highlighting, nothing beats the keyboard.
Line Highlighting
-
To highlight a single line, move your cursor to the start of the line you want to highlight. (You can move the cursor about with the arrow keys on your keyboard. Play about with them and see what happens.)
-
Hold down a Shift key on your keyboard
-
With the Shift key held down, press the End key on your keyboard
-
A single line is highlighted
-
To go the other way, from the end of a line to the beginning, move your cursor to the end of the line (or somewhere in the middle will do for. It works just as well.)
-
Hold down a Shift key on your keyboard
-
With the Shift key held down, press the Home key on your keyboard
-
Your text is highlighted
Paragraph Highlighting
To highlight a paragraph with the keyboard alone, do the following-
Move your cursor to the start or end of the paragraph you want to highlight
-
Hold down a Shift key AND a Ctrl key (bottom left of your keyboard)
-
With the Shift key AND a Ctrl key held down, press the Up or DOWN arrows
-
A paragraph will be highlighted
Highlighting one word at a time
-
For practice purposes, move your cursor to the middle of a line of text
-
Hold down a Shift key AND a Ctrl key
-
With the Shift key AND a Ctrl key held down, press the Left arrow or the Right arrow key on your keyboard
Highlighting one letter at a time
-
For practice purposes, move your cursor to the middle of a line of text
-
Hold down a Shift key
-
With the Shift key, press the Left arrow or the Right arrow on your keyboard
-
A single letter is highlighted for every tap of an arrow key
Opening Microsoft Word Documents
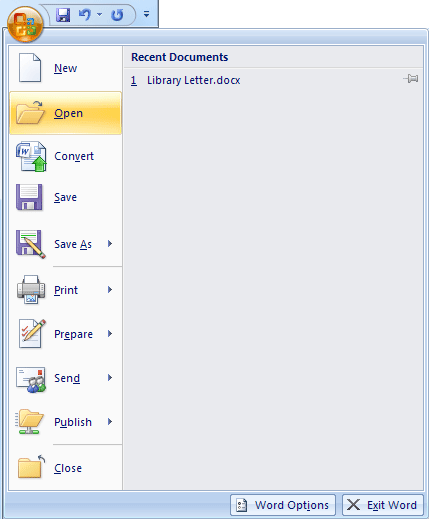
We'll shortly add an address to the top of our Library Complaint letter. Before we do that, we'll learn how to open a file. After all, you might have closed down Microsoft Word, or your computer might have crashed. The result being that you no longer have your library letter loaded into Word. So here's how to open a file you have saved, and want to work on again.
In Word 2007, click the round Office button in the top left of Microsoft Word:
 In Word 2010, you need to click on the File tab in the top left of Word:
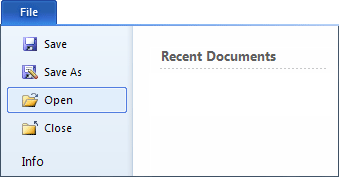 If you see your file under the Recent Documents heading, you can simply click there to open it. However, if it's not on the list, click the Open item on the menu.In Word 2013, when you click the File menu, your document disappears and you'll see this screen:Click on Open from the menu on the left and the right hand side will change to this:
If your document is listed under Recent Documents, simply click it to open it up. If it's not under Recent Documents, select a location under the Open heading. Click on the Computer item and the screen will change to this:
Click on the Browse button again.
In all Word versions, the Open dialogue box appears, and looks like the image below:
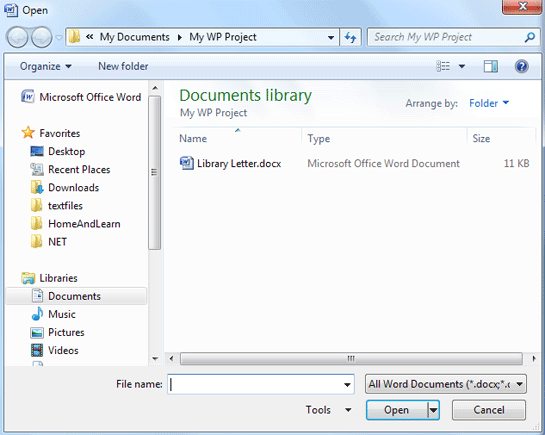 The Open dialogue box looks very similar to the Save As dialogue box. Notice, though, that the File name text box is blank. If you can't see your document in the Documents Library section, you can click where it says All Word Documents. You'll then see a list of file types that can be opened with Microsoft Word:
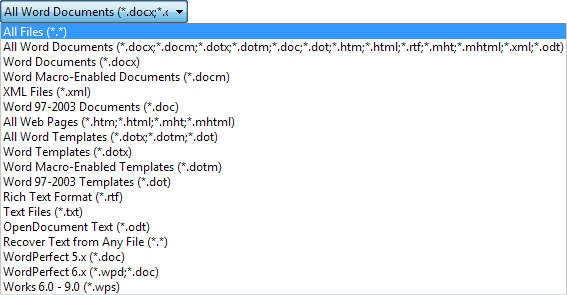 This is more or less the same list you saw with the Save As dialogue box, under Save as Type. So if you don't see your file displayed, remember to display this list.But the File Name text box is empty because no file has been selected. A file is selected from the larger white area in the middle. Clicking on the file once with the left hand mouse button will select a file.
In the image above, the document we want is displayed. But if it's not there, you can use the area at the top to search other folders. Click the My Documents item to see another drop down list:
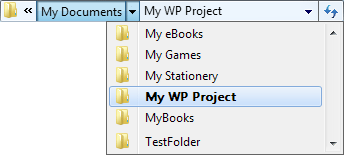 The list shows you all the folders you have in your My Documents folder (this gets shortened to just Documents in Windows 7). Select a folder to move inside of it.You can see more areas on your computer by clicking the double arrows just to the left of My Documents, in the image above. You'll then see another list:
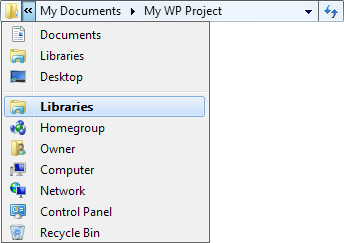 Again, clicking an item on the list takes you to that location. Have a play about with them, and watch how that dialogue box changes. To get back to where you where, you can either use the drop down lists above, or click the arrow buttons just to the left of the lists:
 Clicking the arrows just below the word Open above will take you either back one folder, or forward one folder. If you get totally lost, just click the Cancel button at the bottom of the Open dialogue box, then start again.To open a file, though, select it by clicking the file once with your left mouse button. Its name will then appear in the File Name at the bottom. Once it does, click the Open button.

Adding an Address to a Letter
If you haven't already done so, open your Library Complaint letter. With the file open, do the following:-
Position your cursor so that it is flashing before the letter "D" of "Dear sir or Madam"
-
Hit the Enter key on your keyboard about 5 or six times
-
This will give you a bit of room to type the address. We'll get rid of any unnecessary space later.
-
Your letter should now look something like this one

-
Move your cursor right up to the top, to the first line
-
Type in Mr Irate's address. It's this:
Mr Irate
12 High Street
Evercrease
EV1 EV1When you have finished typing the address, it should look like this: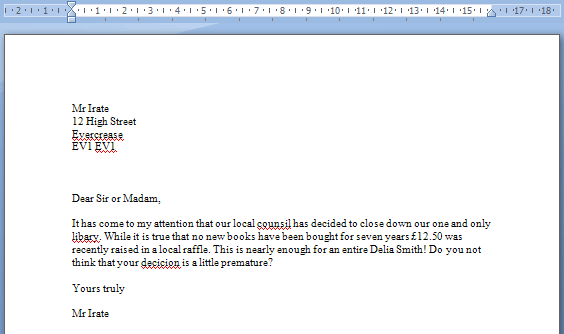 If you have too much space between the postcode and "Dear Sir or Madam" you can remove it by doing this:
-
Position your cursor so that it is flashing before the letter "D" of "Dear sir or Madam"
-
Hit your Backspace key a few times to get rid of any unwanted blank lines
-
Your text will move up one line with every tap of the backspace key
We'll now highlight the address and move it the right. So, using one of the highlighting techniques you have learnt, highlight the address and only the address. When you have finished, it should look like this one: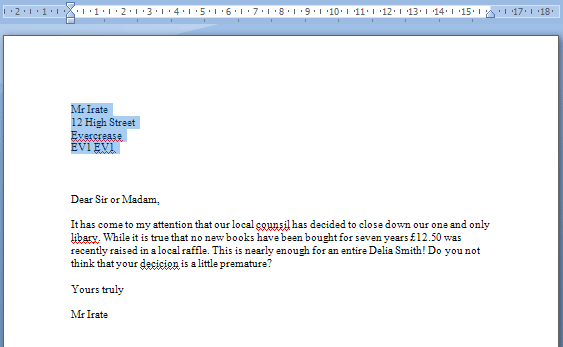 Once we have highlighted the address we can align it to the right. To do that we use the alignment icons on the Home tab at the top of Microsoft Word. The alignment icons look like this:
Word 2007 Alignment options
Word 20010/13 Alignment optionsThe first alignment icon is Align Left; the second one is Centre Align; the third one is Align Right; and the fourth one is Justify.With your address highlighted, click each of the align icons in turn, just to get a feel for how they work. Finally, click Align Right, the third icon. Your address should now look like this: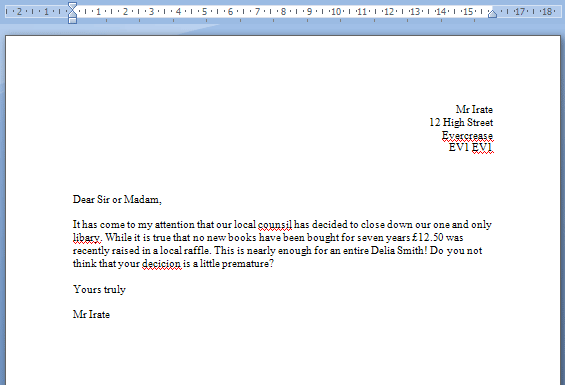 It doesn't look too neat and tidy, and we'll see how to straighten the left side of the address later, when we get on to document tabs. The lesson here, though, was all about highlighting. And, most importantly, that only highlighted text is affected by changes you make. All the other text remained exactly the way it was.
Spelling and Grammar Checking
One thing you probably will have noticed is the spelling mistakes in the letter. You should have typed the letter exactly as it was, and left any spelling errors in. More than likely, the spelling mistakes are underlined in red in your document. Anything with a wiggly green line under it is a grammatical error, (or what Microsoft Word insists is a grammatical error).
The easiest way to correct spelling mistakes is to right click any word that has a red wavy underline. You'll then see a menu appear:
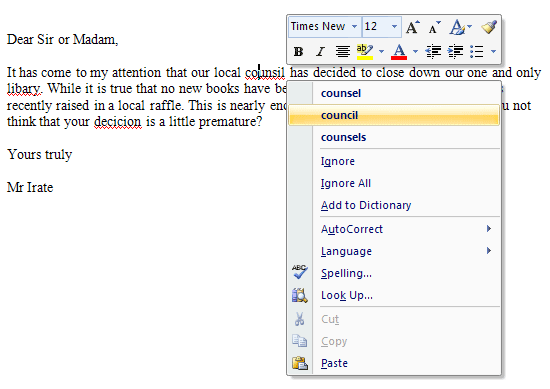 In the image above, we've clicked with the right-hand mouse button on the incorrectly spelt "counsil". The menu that appears shows three alternative words: counsel, council, and counsels. We meant council, of course. Click this option with your left mouse button to replace the misspelt word. The red wavy underline will disappear. (Incidentally, don't worry about the box that appears above the menu as we'll get to formatting options in a later section.)Do the same with the other two misspellings in your letter, and then save your work. Now highlight the address you added to the right.
Spelling and Grammar Options
To check more than one word at a time, you can bring up the Spelling and Grammar dialogue box. To see it, click on the Review tab at the top of Word. On the Review tab, locate the Proofing section. Then click Spelling & Grammar:

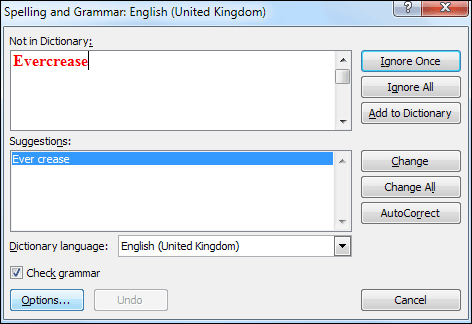
 When you click on Spelling & Grammar, you'll see a dialogue box appear in Word 2007 and Word 2010. This one:
 In Word 2013, you'll see a panel appear on the right of your screen. This one:
 This dialogue box allows you to do most of the things you can do by right-clicking a misspelt word. The Suggestions area lists alternatives to the word you're trying to correct. The suggestion for our fictional town of Evercrease is for two separate words, Ever and Crease. To stop Word highlighting our fictional town as an error, click the Add to Dictionary button on the right. (Or you can click the Ignore buttons.)In Word 2013, you'll see an extra area at the bottom. You can click the speaker symbol to hear the word. You may also see a list of alternatives to the word you typed. In the image above, Word is suggesting assembly, commitee, and meeting.When you have corrected a word, the dialogue box will move on to the next one. In our case it will highlight the fictional postcode, insisting that it is a repeated word. Click Ignore Once and Word will have finished with its corrections. The dialogue box will then go away. To get rid of the Spelling area in Word 2013, click the X in the top right of the panel.
Setting Spelling and Grammar Rules
Sometimes, however, you want a little more control over what spelling and grammar Microsoft Word highlights. For that, there is a Proofing dialogue box.
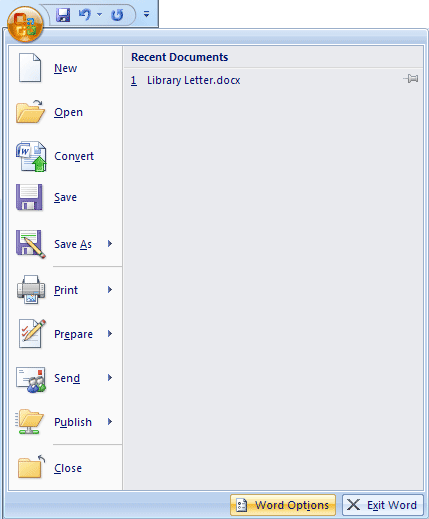
In Word 2007, click the round Office button in the top left. At the bottom of the menu you'll see a Word Options button:
 In Word 2010 and Word 2013, click the File tab again. Have a look for the Options item, near the bottom left:
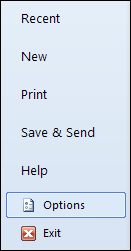 Click Word Options (or just Options) button and you'll see another dialogue box appear. On the left, select the Proofing item. You'll then see the following rather complex list of things you can do:
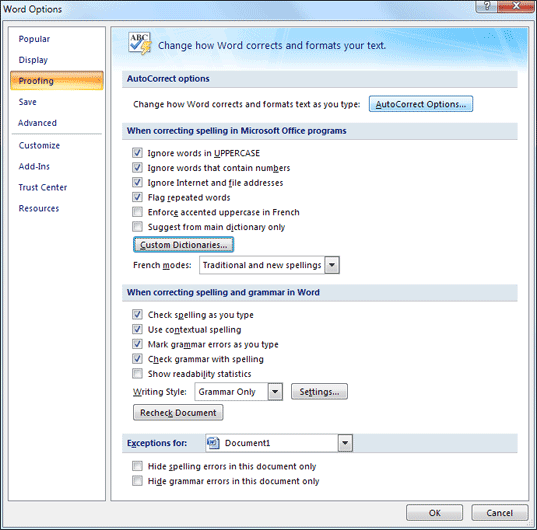 The check marks in each box show what options are currently selected. Click a check mark to deselect that option. Click an empty box to select it. So if you don't want Word behaving like a grammar Nazi, uncheck the box that says Check grammar with spelling.
Microsoft Word AutoCorrect
One interesting option is AutoCorrect. Click the button at the top of the Proofing dialogue box that says AutoCorrect Options. You'll see this dialogue box:
On the AutoCorrect tab, you can see a lot of inbuilt options have been checked. So Word will, for example, automatically capitalize days of the weeks for you as soon as you press the space bar on your keyboard.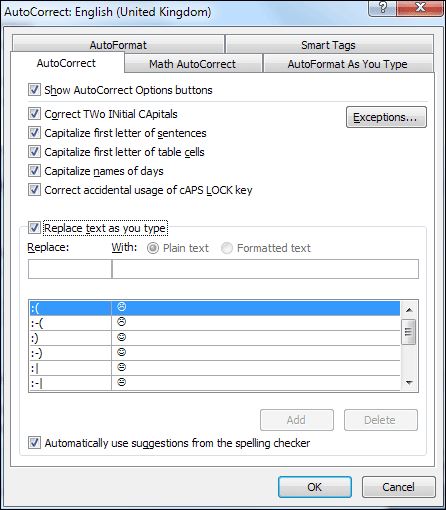
The area at the bottom, "Replace text as you type", has also been checked. What this means is that if you were to type a colon followed by a left round bracket Word will change the two characters into a smiley face. If you don't want Word doing this, select that option from the list. Then click the Delete button.
However, you can use the Replace feature to your advantage. If, for example, you didn't want to keep typing your full name all the time, you can type say two characters into the Replace box. In the With box, type your name, as in the image below:
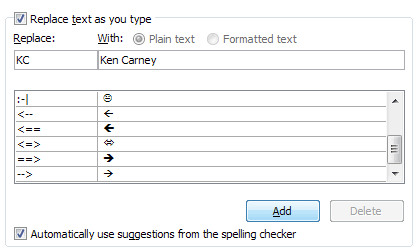 After you click the Add button, your text will be added to the list:
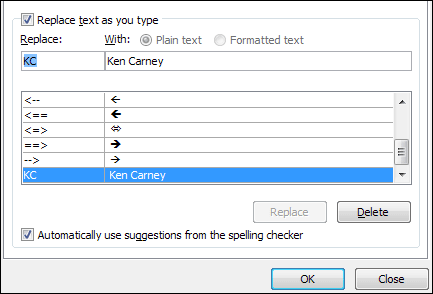 Click the OK buttons on the AutoCorrect dialogue box, and on the Word Options dialogue box and you'll be returned to Word. Now, whenever we type the initials "KC" and then press the space bar on the keyboard, Word will replace them with the name "Ken Carney".
 -
No comments:
Post a Comment